In the dynamic realm of digital marketing, staying ahead is crucial for success. As technology and consumer behavior evolve, marketers must adapt to remain competitive. A pivotal shift in this landscape is the migration to Google Analytics 4 (GA4), an advanced analytics platform revolutionizing how businesses measure and comprehend user interactions across multiple channels.
GA4 represents a quantum leap from its predecessor, Universal Analytics, offering an array of advanced features and enhanced data capabilities. Designed to address the evolving needs of today’s marketers, GA4 delivers a more comprehensive and holistic view of user journeys, providing actionable insights that drive better decision-making and improved marketing performance.
However, the transition to GA4 is not merely an option; it is a necessity. Google has been actively nudging marketers towards GA4, signaling its intention to make it the de facto standard for digital analytics. This means that marketers will have to migrate to GA4 voluntarily or face the inevitability of being migrated by Google itself.
The rationale behind this push towards GA4 lies in its ability to address the limitations of traditional analytics models. Universal Analytics was primarily built around tracking cookies and sessions, which worked well in a web-centric environment but struggled to keep pace with the proliferation of mobile devices, cross-platform interactions, and privacy regulations. GA4, on the other hand, embraces a more flexible and privacy-centric approach, enabling marketers to capture and analyze data from various touchpoints seamlessly.
Google’s commitment to GA4 is evident from its integration into numerous products and services, including Google Ads, Google Tag Manager, and Firebase. By leveraging GA4’s full potential, marketers can unlock the synergy between these platforms, gaining a unified view of their marketing efforts and driving cross-channel optimizations. As Google continues to roll out updates and new features exclusively for GA4, it becomes increasingly clear that migration is not just a matter of choice but a strategic imperative.
In this blog, we will delve deeper into the benefits of GA4, explore the migration process, and highlight key considerations for marketers looking to embark on this transformative journey. By understanding the importance of migrating to GA4 and embracing its capabilities, marketers can seize the opportunities of the future and thrive in an increasingly complex digital marketing landscape.
What’s the deal with Google Analytics 4 (GA4)? How is it different from Universal Analytics (UA)?
GA4 is a more modern and flexible platform than UA. It uses machine learning to provide more insights into user behavior and it supports cross-platform tracking. If you are looking for a more powerful and comprehensive analytics platform, then GA4 is a better choice.
Difference between Universal Analytics (UA) vs Google Analytics 4 (GA4)
Universal Analytics (UA) | Google Analytics 4 (GA4) |
The data model is Session-based | The data model is Event-based |
The last touch attribution model is used in UA | The flexible attribution model is used in GA4 |
The Cross-platform is limited for UA | While GA4 supports cross-platform and also different devices |
As UA is sunsetting there will be no new features going to be added in future | GA4 is the future of Google Analytics, with ongoing feature |
Data model: UA uses a session-based data model, while GA4 uses an event-based data model. This means that in UA, data is collected and analyzed based on sessions, which are defined as a group of user interactions that happen within a certain time period. In GA4, data is collected and analyzed based on events, which are defined as any user interaction that can be tracked.
Attribution modeling: UA uses a last-touch attribution model, while GA4 uses a more flexible attribution model. This means that in UA, credit for conversions is given to the last channel that a user interacted with before converting. In GA4, credit for conversions can be given to multiple channels, based on a variety of factors.
Machine learning: GA4 uses machine learning to provide more insights into user behavior. This includes the ability to identify trends, patterns, and anomalies in user data.
Cross-platform tracking: GA4 supports cross-platform tracking, which means that you can track users across different devices and platforms. This can be helpful for understanding how users interact with your brand across different channels.
Flexibility: GA4 is a more flexible platform than UA. It allows you to customize your data collection and analysis to meet your specific needs.
Future-proof: GA4 is the future of Google Analytics. Google has said that it will no longer be adding new features to UA. This means that if you want to continue using the latest features and capabilities, you will need to migrate to GA4.
If you are still using UA, you should start your migration to GA4. The sooner you migrate, the more time you will have to get used to the new platform and start collecting data
Steps to migrate from Universal Analytics (UA) to Google Analytics 4 (GA4)
- Set up a new GA4 property: Create a new GA4 property within your Google Analytics account. This ensures a separate tracking space for GA4 data without affecting your existing Universal Analytics data.

- Install the GA4 tracking code: Get the GA4 tracking code snippet from your GA4 property settings. Place it correctly on all website pages and mobile apps. Verify that the code is properly implemented to accurately track user interactions.

Test if the codes are firing:
- Steps you can take to check if the GA4 tracking code is firing correctly:
- Check the GA4 tracking code snippet. Make sure that you have copied and pasted the GA4 tracking code snippet correctly into your website or mobile app. You can find the GA4 tracking code snippet in your GA4 property settings.
- Check the placement of the GA4 tracking code snippet. The GA4 tracking code snippet should be placed in the <head> section of your website or mobile app. If the GA4 tracking code snippet is placed in the <body> section of your website or mobile app, it may not fire correctly.
- Check for ad blockers or other extensions. Ad blockers and other extensions can sometimes block the GA4 tracking code from firing. If you are using an ad blocker or other extension, try disabling it to see if that fixes the issue.
- Check the network tab in your browser’s developer tools. You can use the network tab in your browser’s developer tools to check if the GA4 tracking code is firing correctly. To do this, open the network tab in your browser’s developer tools, refresh the page, and look for the GA4 tracking code in the list of requests.
Note: If the GA4 tracking code is not in the list of requests, it is not firing correctly.
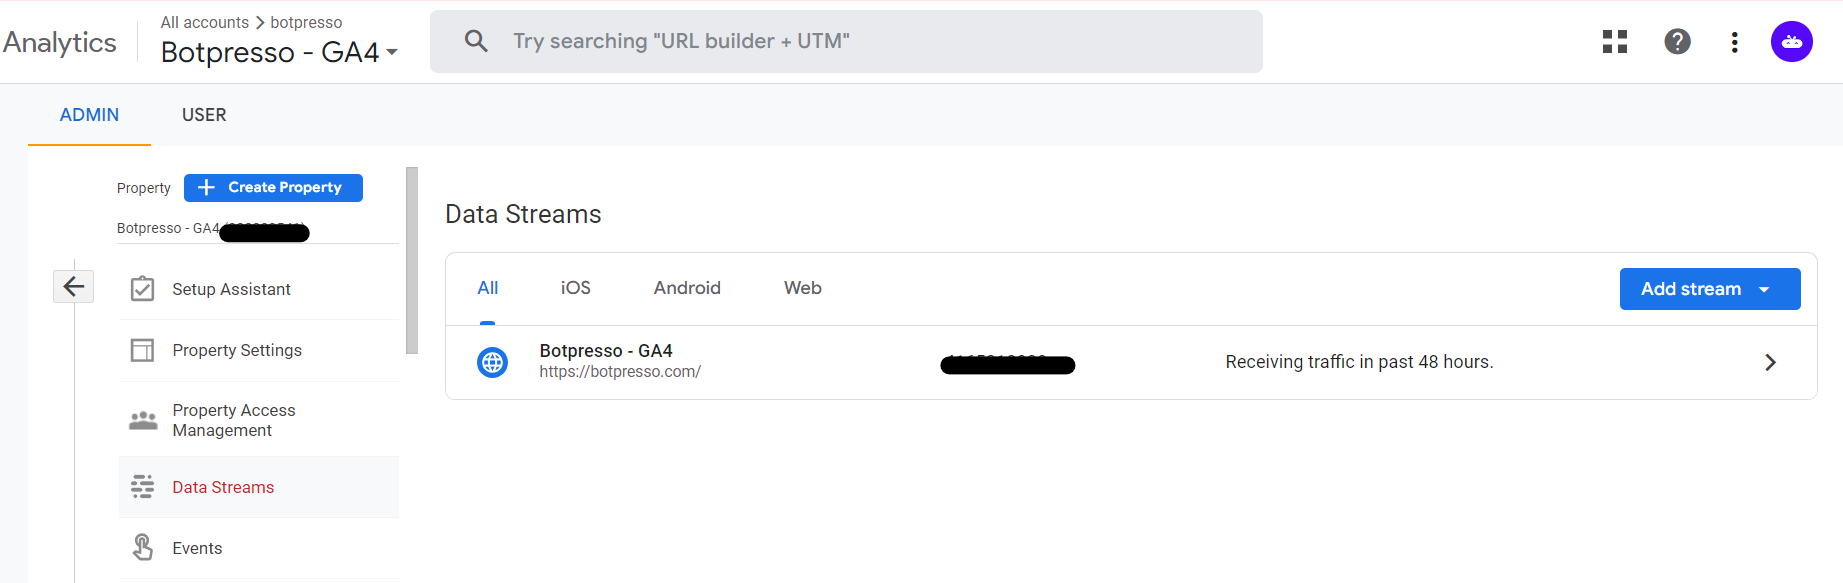
Configure data streams: Establish data streams to collect data from different sources such as websites, mobile apps, and offline channels. Customize the data streams based on your specific tracking requirements.
Set up events and parameters: Define the events and parameters you want to track in GA4. Events capture user actions like pageviews, clicks, and form submissions, while parameters provide additional context to these events, such as product ID or campaign source.
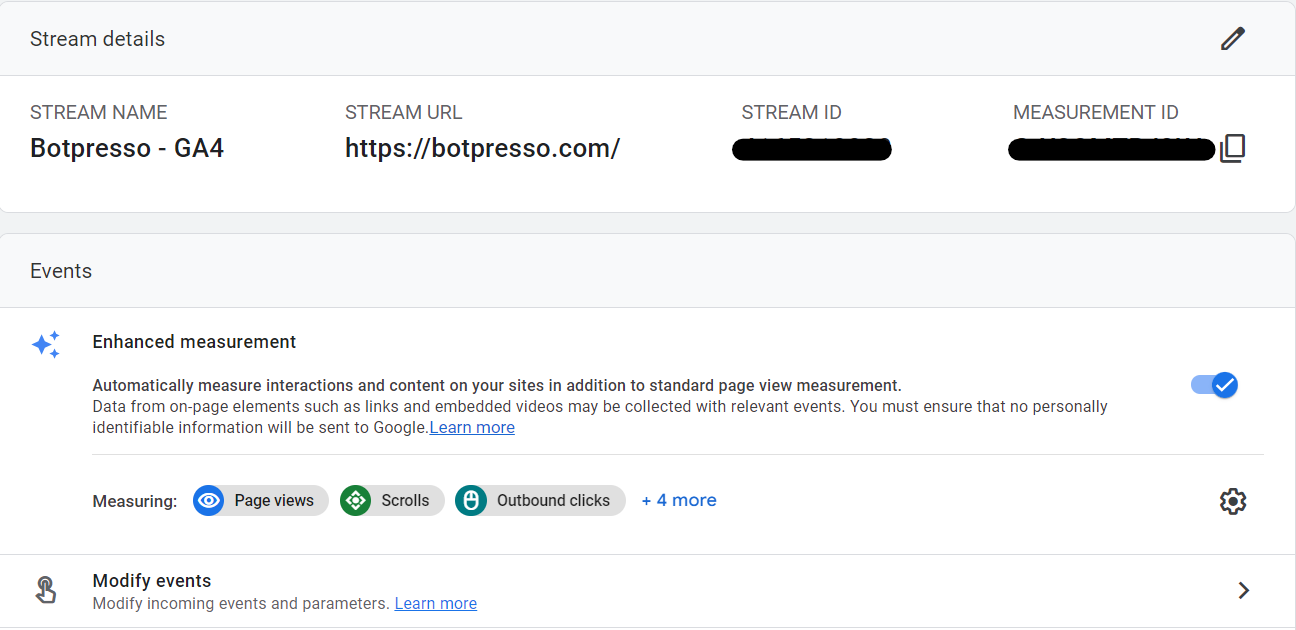
Here are some of the settings that you can customize:
- Scroll depth: This setting determines how many pixels a user must scroll down a page before their scroll is counted as an event.
- Video engagement: This setting determines how long a user must watch a video before their engagement with the video is counted as an event.
- File downloads: This setting determines how long a user must wait before their download of a file is counted as an event.
Once you have enabled and customized the settings for enhanced measurement, GA4 will automatically start tracking the selected user interactions.
- Import existing data: If you have historical data in Universal Analytics, consider importing it into GA4 to have a consolidated view of your analytics. Use data import or link your Universal Analytics property to your GA4 property.
To import existing data from Universal Analytics (UA) to Google Analytics 4 (GA4), you can follow these steps:
Here’s how you can import existing data from UA to GA4:
Scroll depth: This setting determines how many pixels a user must scroll down a page before their scroll is counted as an event.
- Sign in to Google Analytics
- In the left navigation panel, click “Admin”
- In the “Account” column, select the account that contains your UA property
- In the “Property” column, select the UA property that you want to import data from
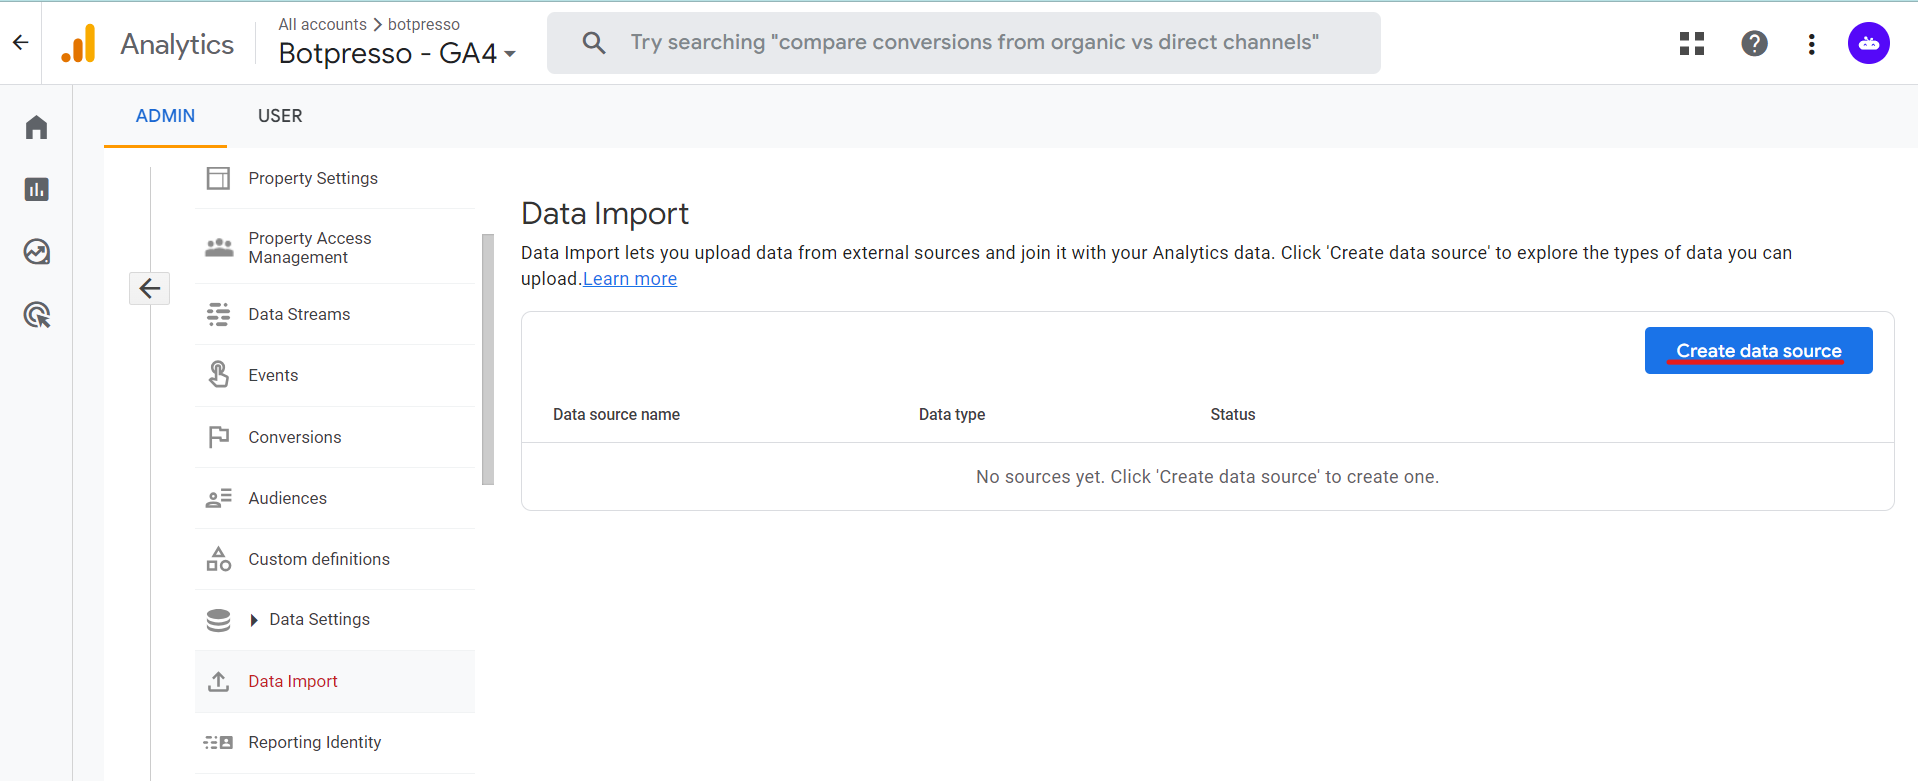
- In the “Property settings” section, click “Data Import”
- Under “Data sources,” click “Create new data source”
- In the “Data source type” drop-down menu, select “Universal Analytics”
- In the “Property ID” field, enter the ID of your UA property
- In the “Start date” field, enter the date that you want to start importing data from
- In the “End date” field, enter the date that you want to stop importing data from
- Click “Create data source”
- Once the data source has been created, click “Import data”
- In the “Import data” dialog box, select the data that you want to import
- Click “Import” – Once the data has been imported, it will be available in your GA4 property

Here are some additional things to keep in mind when importing data from UA to GA4:
- Not all data from UA will be available in GA4. For example, data from custom dimensions and metrics will not be imported
- The data that is imported may not be exactly the same as the data in UA. This is because GA4 uses a different data model than UA
- You may need to adjust your reports and dashboards after importing data from UA to GA4. This is because the data may be organized differently in GA4 than it was in UA.
- Set up goals and conversions: Establish conversion goals in GA4 to track key actions aligned with your business objectives. Configure conversion events and funnels to monitor user progression and identify conversion process bottlenecks.
Here are the steps on how to set up goals and conversions in GA4:
- Go to your GA4 property and click on “Conversions” in the left-hand menu.
- Click on “New conversion event” and give your conversion event a name.
- Select the type of conversion event you want to track. There are three types of conversion events:
- E-commerce: Track purchases made on your website or app.
- Goals: Track other important actions, such as form submissions or newsletter sign-ups.
- App events: Track actions taken within your mobile app, such as in-app purchases or level completions.
- Select the conditions that must be met for a conversion to be recorded. For example, you might want to track only purchases that are over a certain amount or only form submissions that include all of the required fields.
- Click on “Create” to save your conversion event.
Once you have created your conversion events, you can use them to track the progress of your users and identify areas where you can improve your conversion rate.
For example, you can use funnels to track the steps that users take before converting. This information can help you identify which steps are causing users to abandon your site or app and make changes to improve the user experience.
- Configure data filters and views: Create data filters and views to refine your data analysis. Apply filters to exclude internal traffic or specific IP addresses. Create customized views to segment your data based on specific criteria.here are the steps on how to configure data filters and views:
- Sign in to Google Analytics
- Click on the Admin tab.
- Select the view that you want to create a filter or view for.
- In the VIEW column, click Filters.
- To create a new filter, click + Add Filter.
- Select the type of filter that you want to create.
- Enter the filter criteria.
- Click Save.
To create a customized view, follow these steps:
- In the VIEW column, click Views.
- Click + Create View.
- Enter a name for the view.
- Select the filters that you want to apply to the view.
- Click Create.
- Once you have created a filter or view, you can apply it to your data analysis by selecting the filter or view from the Filters or Views drop-down menus.
Here are some examples of how you can use filters and views to refine your data analysis:
- Exclude internal traffic: If you want to exclude traffic from your own computers from your data analysis, you can create a filter that excludes traffic from your IP addresses.
- Exclude specific IP addresses: If you want to exclude traffic from specific IP addresses from your data analysis, you can create a filter that excludes those IP addresses.
- Segment your data based on specific criteria: You can create customized views to segment your data based on specific criteria, such as country, city, or device type.
By using filters and views, you can refine your data analysis and get more insights into your
- Explore analysis tools and reports: Familiarize yourself with GA4’s analysis tools and reports. Utilize the Exploration feature for ad hoc analysis, leverage the Funnel Analysis report to visualize user journeys, and use other reports to gain insights into user behavior.
- Update integrations and third-party platforms: Ensure that your integrations with other platforms, such as Google Ads and Google Tag Manager, are compatible with GA4. Update configurations and tags to maintain a seamless flow of data.
Interesting things that you should know about the new Google Analytics-4
- Everything is an Event: Unlock the Power of User Interactions:In GA4, every action on your website becomes an event, from clicks to form submissions. This revolutionary approach expands the scope of tracking, providing a treasure trove of valuable data about user behavior. By leveraging this wealth of information, you can gain deeper insights into how visitors engage with your site, enabling you to fine-tune your SEO strategy and create exceptional user experiences.
- Data-Driven Attribution Model: A Clear Path to Success: Bid farewell to the limitations of traditional attribution models and embrace GA4’s data-driven approach. By considering the complete user journey, GA4 provides a comprehensive view of the touchpoints that contribute to conversions. This advanced attribution model allows you to accurately assess the impact of each marketing channel, optimize your SEO efforts, and allocate resources more effectively.
- Session Source/Medium: The Reliable Metric Revolution:GA4 introduces session source and medium metrics as reliable indicators of how visitors discover your website. Unlike Universal Analytics, which relied on unreliable cookies, GA4 employs advanced tracking methods to accurately identify the sources that bring in valuable traffic. This enhanced visibility empowers you to make data-backed decisions and allocate your resources wisely, ensuring maximum ROI on your SEO investments.
- Bounce Rate Redefined: Unveiling the True Measure of Engagement.
Bounce rate has long been a flawed metric, easily manipulated by single-page visits. GA4 revolutionizes this concept by measuring engagement rate instead. By considering factors such as time spent on site and the number of pages visited, GA4 provides a more accurate reflection of user engagement. This shift enables you to gauge the true success of your SEO efforts, identify areas for improvement, and create captivating user experiences.
- Extend Event Data Retention: Preserve and Uncover Insights.
By default, GA4 retains event data for two months. However, to delve deeper into historical trends and unlock valuable insights, you can extend the retention period to 14 months. This simple step ensures you have a longer window to analyze data, identify patterns, and make informed decisions that propel your SEO strategy forward.
- Unleash the Power of Google BigQuery: Empowering Brands with Advanced Analytics.
With GA4, you have access to the formidable capabilities of Google BigQuery. This premium powerful data warehousing solution enables you to store, manage, and analyze vast amounts of data from GA4. By harnessing the power of BigQuery, you can uncover hidden patterns, perform complex analyses, and derive actionable insights that drive your SEO strategy to new heights.
To Learn more about BigQuery Exports setup, click here
- Overcoming UA Limitations: Integrating Firebase for Holistic Tracking
GA4 addresses the challenges faced by Universal Analytics by seamlessly integrating with Firebase. By combining web and app tracking on a single platform, GA4 empowers brands and marketers to monitor and optimize your entire digital ecosystem. This holistic approach enables you to gain a comprehensive view of user behavior, refine your SEO strategy across multiple channels, and enhance the overall performance of your digital assets.
- Embracing Data Disparity: A Journey of Exploration
During the transition from Universal Analytics to GA4, you may encounter slight differences in reported data. This variation is primarily due to the contrasting methodologies used by the two platforms. Embrace these disparities as an opportunity to explore the intricacies of your SEO analysis further. By understanding the nuances, you can adapt your strategies, identify potential gaps, and refine your approach for more accurate insights.
- Troubleshoot with Omnibug: Tool for debugging GA-4 tracking code issues
Omnibug remains your trusty companion, providing troubleshooting capabilities and verifying the correct configuration of event tracking and data collection in GA4. With Omnibug by your side, you can ensure seamless data flow, troubleshoot any issues that arise, and maintain the integrity of your SEO tags for optimal performance.
- Choose Your Conversion Count Settings: Tailor Your Metrics
GA4 offers the flexibility to choose how events are counted as conversions. Opt for “Once per session” if you prefer a counting methodology aligned with Universal Analytics. Alternatively, select “Once per event” to count every event as a conversion. This freedom allows you to align your SEO tracking with your specific goals, empowering you to measure success accurately and optimize your strategies accordingly.
- GA4’s Predefined Events: Accelerating Your SEO Journey
GA4 comes equipped with a comprehensive collection of predefined events that cover common user actions. These ready-made events, such as pageviews, video plays, and form submissions, expedite your SEO journey by providing a solid foundation. Leveraging these predefined events saves time and effort, allowing you to focus on refining and optimizing your SEO strategy instead of starting from scratch.
- Unleash the power of Google Search Console integration:Uncover the hidden gems of your SEO performance with Google Search Console integration. By linking GA4 and Search Console, you can unveil the top-performing keywords that bring visitors to your site. This precious knowledge empowers you to fine-tune your SEO efforts and conquer the search rankings.
Here are the steps on how to integrate Google Analytics 4 (GA4) with Google Search Console:
- Sign in to both Google Analytics 4 and Google Search Console.
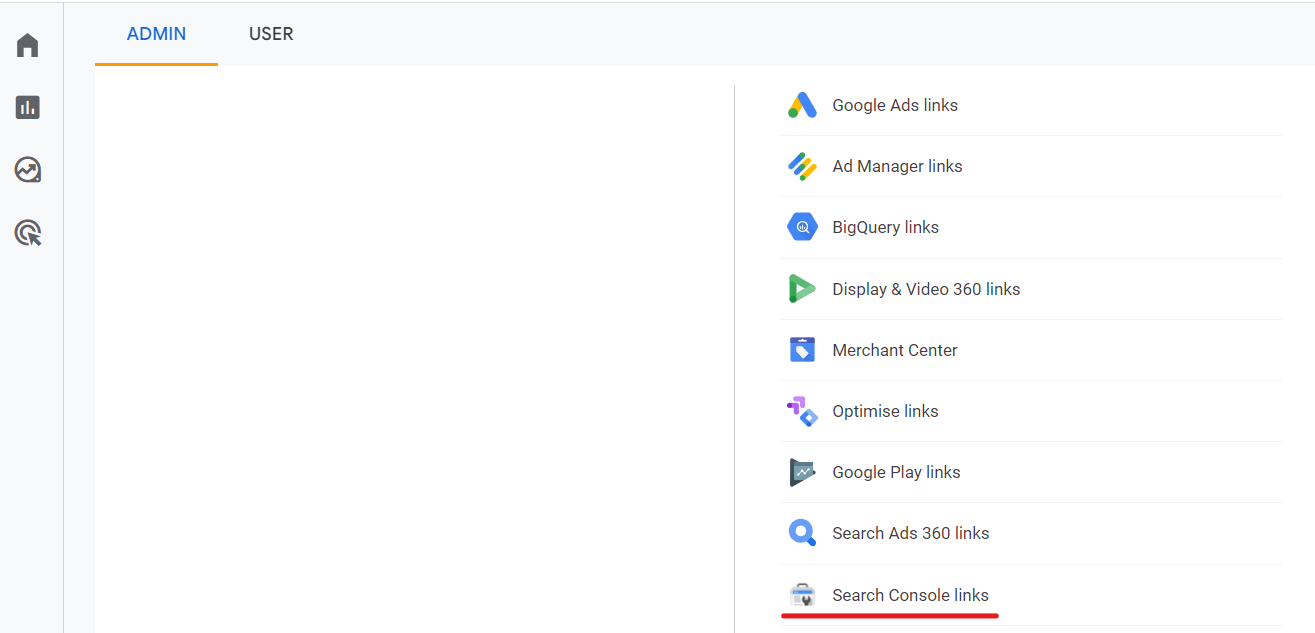
- In Google Analytics 4, go to the Admin section and click on Search Console Linking.
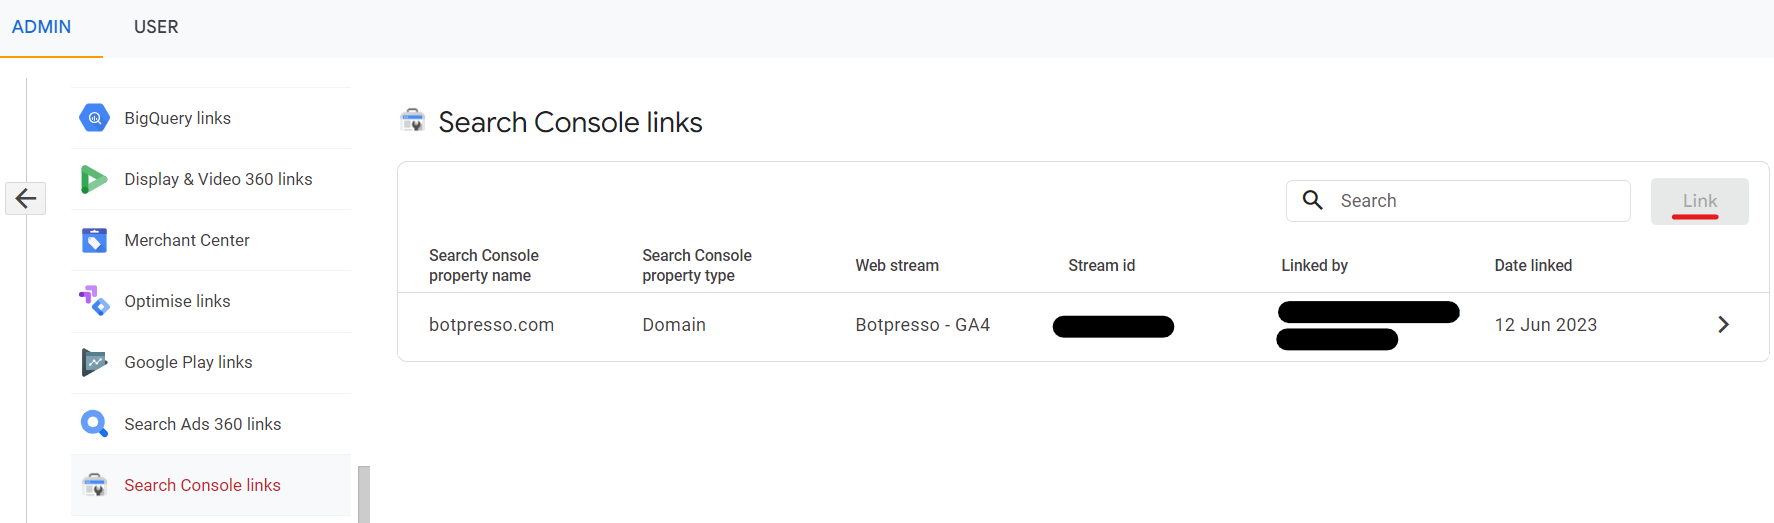
- If you are a verified owner of the Google Search Console property that you want to link, click Link. If you are not a verified owner, you will need to verify ownership before you can link the properties.
- In the Search Console property field, select the Google Search Console property that you want to link.
- In the Web data stream field, select the web data stream that you want to link.
- Click Next.
- Review the configuration settings and click Submit.
 Once you have linked your Google Analytics 4 property to Google Search Console, you will be able to see data from Google Search Console in your Google Analytics 4 reports.

Common Issues with Google Analytics 4 (GA4) and How to Overcome Them
1)Why am I seeing “(not set)” in my GA4 reports?
The “(not set)” value in GA4 reports typically indicates that the data being tracked is missing some essential information. To overcome this issue, ensure that your tracking implementation is correctly configured to capture all necessary parameters, such as page titles, URLs, or event properties.
Double-check your tracking code or consult the documentation provided by Google Analytics to ensure you’re sending complete data.
2)Why is my GA4 data showing fewer sessions than my previous Universal Analytics (UA) data?
GA4 and UA track data differently, which can result in discrepancies between the two. GA4 follows a stricter privacy model and may exclude some sessions that were previously captured in UA.
Additionally, make sure you’re comparing the same timeframes and have implemented the GA4 tracking code correctly.
3)Why are my events not showing up in GA4 reports?
Several factors could cause events to not appear in GA4 reports. First, confirm that you’ve implemented the GA4 event tracking code correctly on your website or app.
Verify that the event names and parameters align with what you expect to see in the reports. Additionally, check if there are any filters or data settings in your GA4 configuration that may be excluding or modifying event data.
4)How can I track e-commerce transactions in GA4?
Tracking e-commerce transactions in GA4 requires specific configuration. Ensure that you have enabled the Enhanced E-commerce feature in your GA4 property settings.Next, implement the necessary event tracking code to capture transaction details, such as transaction ID, product SKU, and revenue.
Refer to the GA4 documentation for detailed instructions on setting up e-commerce tracking.
Testing your implementation and validating the data in the GA4 reports is essential to ensure accurate tracking.
5)Why is my GA4 data delayed or not updating in real-time?
Real-time data in GA4 can experience delays due to various factors, including network latency, data processing, or system updates. Usually, data is processed and made available within minutes, but occasional delays can occur.
If you notice significant delays or data not updating for an extended period, check the GA4 status dashboard or the Google Analytics Help Center for any known issues. You can also verify if your tracking code is correctly implemented and if there are any network or server connectivity issues on your end.
6)How can I exclude my own visits from GA4 tracking?
Preventing your own visits from being tracked in GA4 requires implementing filters or exclusions based on IP addresses. Identify your IP address by searching “What is my IP” on a search engine, and then create an IP exclusion filter in the GA4 admin settings.
Remember to test the implementation to ensure that your visits are properly excluded from the tracking data.
7) How do I create custom reports in GA4?
Creating custom reports in GA4 allows you to tailor your analytics to specific business needs. To create a custom report, follow these steps:
- Log in to your Google Analytics account and navigate to the GA4 property you want to work with.
- Click on the “Analysis” tab in the left sidebar.
- Select the “Custom Reports” option.
- Click on the “+ New Custom Report” button.
- Choose the report type that suits your requirements (e.g., Exploration, Funnel Analysis, Path Analysis).
- Configure the dimensions, metrics, filters, and segments for your custom report.
- Give your report a meaningful name and save it.
- Access your custom report from the “Custom Reports” section in the future.
- Experiment with different dimensions, metrics, and visualization options to create insightful custom reports that align with your specific analytics objectives.
8) Can I use filters to modify my GA4 data?
Yes, you can use filters to modify and refine the data in your GA4 reports. Filters allow you to include or exclude specific data based on predefined conditions. To set up filters in GA4, follow these steps:
- Go to your GA4 property and access the Admin section.
- In the “View” column, click on “Filters.”
- Click on the “+ New Filter” button.
- Define the filter type (e.g., exclude, include, lowercase, uppercase, search and replace).
- Configure the filter settings, such as field, pattern, and action.
- Apply the filter to the views where you want it to take effect.
- Save the filter.
Remember that filters permanently modify your data, so use them carefully. It’s recommended to create a test view to evaluate the impact of filters before applying them to your main reporting views.
9) How can I set up goals in GA4?
Goals in GA4 allow you to track and measure specific user actions or conversions on your website or app. Follow these steps to set up goals in GA4:
- Go to your GA4 property and access the Admin section.
- In the “View” column, click on “Goals.”
- Click on the “+ New Goal” button.
- Choose a goal template or select “Custom” to create a unique goal.
- Define the goal details, such as the goal name, type, and configuration options.
- Configure the goal settings, such as destination, duration, pages/screens per session, or event-based triggers.
- Save the goal.
Once you’ve set up goals, GA4 will start tracking and reporting goal conversions, providing valuable insights into user behavior and performance.
10) Is it possible to export GA4 data for further analysis?
Yes, GA4 allows you to export your data for further analysis in various formats. To export data from GA4, follow these steps:
- Go to your GA4 property and navigate to the report you want to export.
- Customize the report by selecting the desired dimensions, metrics, and filters.
- Click on the “Export” button located at the top of the report.
- Choose the export format that suits your needs (e.g., CSV, Excel, Google Sheets, PDF).
- Select the export options, such as date range and report structure.
- Click on the “Export” button to initiate the download.
Once the export is complete, you can use the exported data for further analysis, data visualization, or integration with other tools or platforms.
11) Can I link GA4 with other Google products like Google Ads?
Yes, you can link GA4 with other Google products like Google Ads to share data and gain valuable insights. To link GA4 with Google Ads, follow these steps:
- Access your GA4 property and navigate to the Admin section.
- In the “Property” column, click on “Data Streams.”
- Select the data stream associated with the app or website you want to link to Google Ads.
- Click on “Google Ads Linking.”
- Follow the prompts to create a new link or link to an existing Google Ads account.
- Choose the relevant Google Ads account and properties you want to link.
- Save the configuration.
Once the link is established, you can access GA4 data directly within Google Ads, allowing you to optimize your advertising campaigns based on GA4 insights.