Have you been facing issues with your product feed in the Merchant Centre? A while back, we did too. We tried various activities, but for a long time, we weren’t able to crack it until we finally connected with a Google Merchant Centre assistant. In this article, we’ll guide you through the process of bulk uploading your products and share essential tips to ensure your product listings are error-free.
💡Update only one Google Sheet to avoid confusion and duplication of product listings.
Addressing the elephant in the room: Follow the steps below if you are seeking an answer on how to add products to Google Merchant Center.
1. Prepare your upload file containing the product information for the products you want to add to your Merchant Center. In case you are wondering what an upload file is and how to get it done, I have listed the important attributes below and a sample document.
Click here to get a copy of the document!
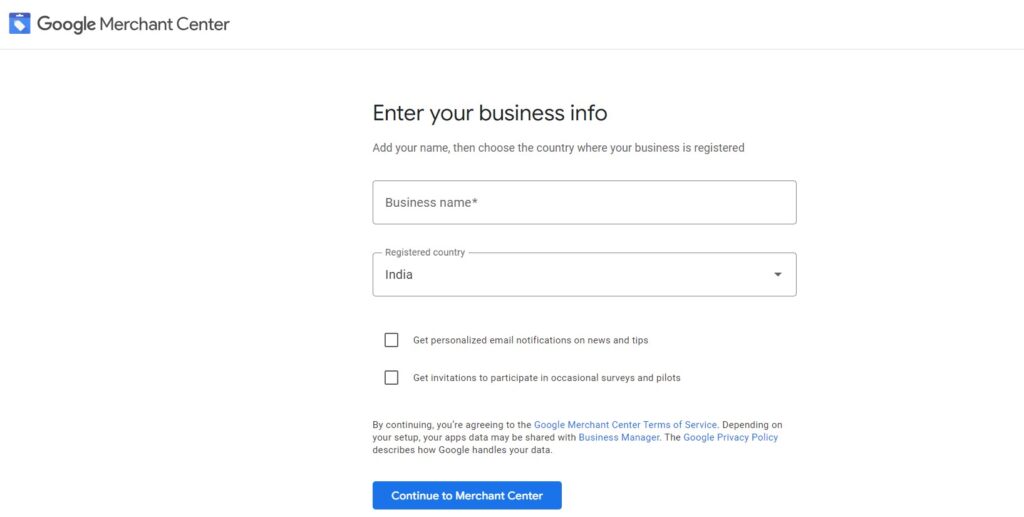
2. Upload your file to your Merchant Center account:
- Sign in to your Merchant Center account.
- Select “Products” from the navigation menu, then click on “Feeds.”
- Click on the “+” sign under the primary feed.
- Select your Target Country and Language and hit “Continue.”
- Name your feed and choose Google Sheets as your input method.
- If you already have a sheet prepared, click on Select an existing Google spreadsheet. Otherwise, click on Generate a new Google spreadsheet from a template.
3. Based on your previous selection, you either have your product list updated, or you need to click on “Access Google Sheets” and copy-paste the data on the same.
Apart from the above, you can also add products individually by following these below steps:
- Sign in to your Merchant Center account.
- Navigate to the Products section in the menu and click on All Products.
- Click the “Add Products” button and choose to add products one by one.
- Complete the necessary fields with the required product information.
- (Optional) If your inventory includes similar products with variations in color, size, gender, or other attributes, head to the “Detailed product description” section. Click on “I have an apparel or variant products” to add details for each variant, such as colors, genders, age groups, sizes, materials, and patterns. Specify the attributes and their corresponding values that distinguish your variant items.
- Click Save.
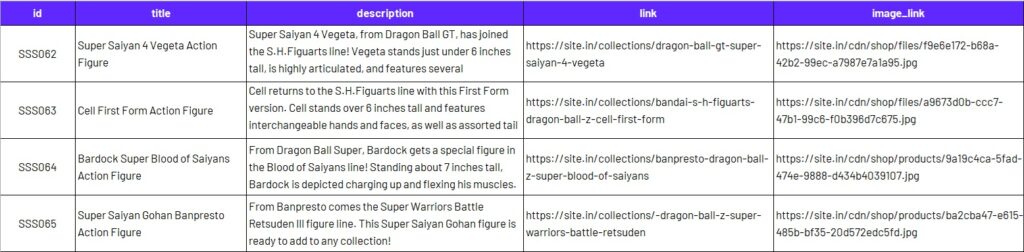
Important attributes that need to be a part of your sheet are:
Product ID [id]:
This is your product’s unique identifier with a limit of 50 characters.
Points to consider:
• Use a unique value for each product.
• Use the product’s SKU where possible.
• Keep the ID the same when updating your data.
• Use only valid Unicode characters.
• Use the same ID for the same product across countries or languages.
Product Title [title]:
This is your product’s actual name with a limit of 150 characters.
Brand: Add the brand to the product title to increase brand awareness for your newly launched business.
Points to consider:
• Accurately describe your product and match the title from your landing page. I would recommend replicating the H1 tag from your product landing page. Remember, your product name is your keyword here; however, avoid stuffing or spamming.
• Avoid promotional text like “free shipping,” all capital letters, or gimmicky foreign characters.
Product Description [description]:
This is your product’s description with a limit of 5000 characters.
Points to consider:
• Accurately describe your product and match the description from your landing page. However, here you have the liberty to target your non-branded keywords to improve their SEO value.
• Here again, avoid promotional text like “free shipping,” loud texts in the form of all capital, or gimmicky foreign characters. Keep it subtle and spam-free.
• Include only information about the product. Don’t include links to your store, sales information, details about competitors, other products, or accessories.
• Use formatting (for example, line breaks, lists, or italics) to format your description.
Product Link [link]:
This is the URL of your product’s landing page.
Points to consider:
• Use your verified domain name and make sure the URL is crawlable.
• Start with http or https.
• Use an encoded URL that complies with RFC 2396 or RFC 1738.
Product Image Link [image_link]:
This is the URL of your product’s main image.
Points to consider:
• Add the link to the main image of your product and make sure the URL is crawlable.
• Start with http or https.
• Use an encoded URL that complies with RFC 2396 or RFC 1738.
• Make sure the image accurately displays the product.
• Avoid spamming the images with promotional text, watermarks, or borders.
Product Price [price]:
This is the actual price of the product as listed on your website.
Points to consider:
• Accurately submit the product’s price and currency and match it with the price from your landing page and at checkout.
• Make sure that your landing page and the checkout pages include the price in the currency of the target country in a place that’s straightforward to find.
• Ensure that the product can be purchased online for the submitted price.
• Make sure that any customer in the target country can buy the product for the submitted price without paying for a membership.
Availability [availability]:
This depicts your product’s availability. Highly recommended to list [in_stock] products.
Other supported values are:
• Out of stock [out_of_stock]
• Preorder [preorder]
• Backorder [backorder]
Points to consider:
• Accurately submit the product’s availability and match the availability from your landing page and checkout pages.
Note: Availability date [availability_date] will be needed if the product availability is set to preorder.
Brand [brand]:
This is your product’s brand name with a limit of a maximum of 70 characters.
Points to consider:
• Provide the brand name of the product generally recognized by consumers.
• Providing the correct brand for a product will ensure the best user experience and result in the best performance.
• Only provide your brand name as the brand if you manufacture the product or if your product falls into a generic brand category.
• For products that truly do not have a brand (for example, a vintage dress without a label, generic electronics accessories, etc.), leave this field empty.
• Don’t submit values such as “N/A,” “Generic,” “No brand,” or “Does not exist.”
Condition [condition]:
This is the condition of your product at the time of sale.
Supported values:
• New [new] Brand new, original, unopened packaging.
• Refurbished [refurbished] Professionally restored to working order, comes with a warranty, may or may not have the original packaging.
• Used [used] Previously used, original packaging opened or missing.
Google Product Category [google_product_category]:
This is more like a breadcrumb navigation for crawlers to understand the categorization. This has to be selected from a list of Google-defined product categories for your product.
Points to consider:
• Include only one category.
• Include the most relevant category.
• Include either the full path of the category or the numerical category ID, but not both.
Reference link: Google Product Category Taxonomy
Product Type [product_type]:
This is the product category that you define for your product with a maximum of 750 alphanumeric characters.
Points to consider:
• As per Google’s official documentation, include the full category. For example, include Home > Women > Dresses > Maxi Dresses instead of just Dresses.
• However, while on call, our advisor stated it was okay to use just the final category, and that is what we went ahead with.
Please note, that all-important attributes should be present while uploading. In case of a miss, one can always go back and edit the document. However, if the products were uploaded manually, you will have to delete them one by one.
Google Merchant Center Product Upload Limit [Bonus!]
Google Merchant Center uses quotas to keep the platform stable and fair for all merchants. These limits control how many products, sub-accounts, data sources, and API calls you can use.
Product quotas:
Limit how many products you can upload. Standard accounts usually allow up to 150,000 products per scope, while larger marketplace and eCommerce MCAs can support millions.
Sub-account limits:
MCAs can create a limited number of sub-accounts. Standard MCAs allow 50, while marketplace and eCommerce MCAs can support thousands.
API quotas:
API usage is limited to manage traffic and system performance.
Data source quotas:
- Up to 200 data sources per account/sub-account
- Up to 1,000 at MCA level
- Feed files can contain up to 5 million items per country/language
- Daily upload limits apply
Other limits:
- Max 1,000 unique values per custom label
- Local inventory entries are also limited
What happens if you hit a limit?
Extra products, uploads, or sub-accounts won’t be processed. You may need to remove older or unused items to free up space.
Ignite Your E-Commerce Radiance
Mastering bulk product uploads on Google Merchant Centre is crucial for a seamless e-commerce experience. By ensuring accurate and comprehensive information in your product feed, you enhance visibility and contribute to a positive user experience. Remember, consistency is key—maintain a single updated Google Sheet to avoid confusion. Follow these guidelines meticulously, and you’ll find yourself navigating the complexities of Google Merchant Centre with ease, propelling your products to new heights in the online marketplace. Happy uploading!