Step 1 – Create a Plan for the New Instance
This is the very initial stage of a website migration. This is the stage where the SEO Team needs to be involved. This is the stage where the business will explain the objectives they want to achieve with the migration.
It will vary from use case to use case. For example, the business or any respective team may have identified an issue with the current website that it isn’t good on CRO, UI & UX parts. This needs to be communicated to the SEO Team so that they can also add some value to the decision-making as the new instance is being developed.
This is where you throw down the ideas for the new instance. The role of the SEO team is to balance out SEO & CRO.
An example can be migrating a ccTLD to a subdirectory, while migrating the business & performance marketing team may consider optimizing certain other things as well, instead of migrating it as it is. So it can be the case that the ccTLD URLs were unhygienic, the SEO recommendation could be to create hygienic URLs, it could be the case that ccTLDs weren’t serving breadcrumbs on Product Pages, weren’t displaying visible Heading 1 tag on the product category pages.
These are the things that can be optimized in the migration, this is where SEO will play a role while still being in the planning stage.
Step 2 – Determine the best time to migrate the website
Timing also plays a crucial role in website migration. It’s ideally better to migrate the website when it is in its lowest traffic. This means that do not choose months when your website is expected to capture more organic traffic due to seasonality.
For example, a travel website that has observed a pattern over the years that it receives disproportionate traffic in October, November & December & gets the worst dip in January & February. For such a website, it’s best to migrate in the month of January & February.
Another thing to consider here is Google Updates. If a Broad Core Update is expected in a certain month with absolute certainty then avoid that month. Google re-evaluates the website to adjust its performance based on the update and in times like this, if you introduce site-wide changes then you are bound to suffer worse. The same goes for other scheduled Google updates like Product Reviews Update, Spam Update, HCU, etc.
Step 3 – Determine the Roles & responsibilities of the players in the Migration
Before getting started with the migration it is important to define the roles & responsibilities of the players involved in the migration. This is to make the ownership over specific migration tasks as crystal clear as possible later on which would only delay the ETA.
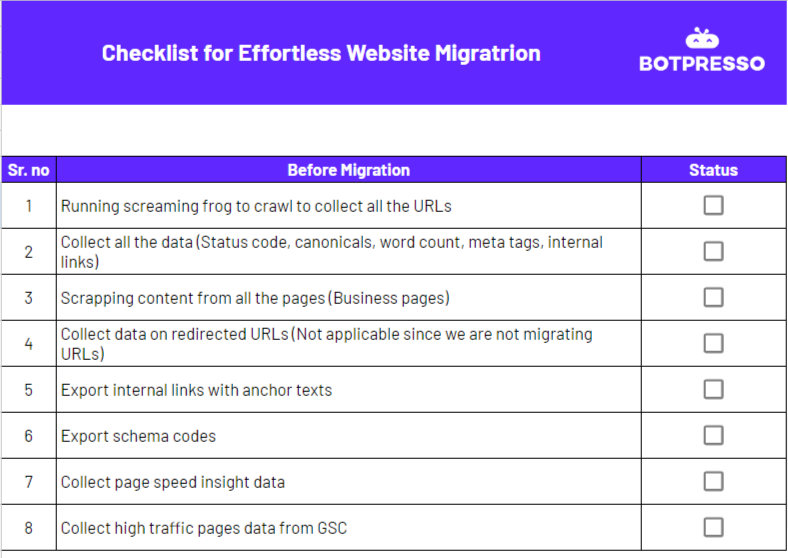
Step 4 – Crawl the current website & collect the data
When conducting the migration to a new instance it is important to retain the SEO elements that are already helping the site.
The goal here is to use an efficient crawler like Screaming Frog or OnCrawl and a couple of others to completely crawl the current website & collect all the important data points.
What data do you need to collect?
- Meta Tags
- Header Tags
- Boilerplate Content (if any)
- Word Count
- Schema Code
- Status Code of landing pages
- Inlinks & Outlinks Mapping Page to Page
- Internal Link Report of Screaming Frog which says which page is linked to which page using what anchor & on which location
- Canonical Links Data
- Robots Meta Tags
- Core Web Vitals Data for the sample set of every page template
- SSR (Server Side Rendering) for any JS site information for every page template (understanding what aspects are SSRd)
- GSC High Traffic Pages Data
- Pages that are ranking for specific keywords are categorized as ‘top prio pages’.
Step 5 – Create a Stage instance and block access to it
This is the stage where you create a stage instance for a website & whatever changes you want to implement are live in this stage instance.
You need to block Google access to this stage instance so that the stage instance doesn’t get indexed. To do that, you need to robots.txt disallow the stage instance & apply server-side authentication.
Step 6: Audit the Stage Instance & get it fixed
You already have data for the current website that you collected in Step 2, now in this step you need to completely crawl the stage instance & collect the same data points that you gathered for the current production website.
Now you need to do a 1:1 check for all the aspects to see if the data matches. This means that meta tags, Header tags, and Schema code all need to match in the stage instance while you are auditing.
If you have optimized the SEO data points in the stage instance then in that condition it wouldn’t match which is okay. But you just need to make sure that you are going live with an optimized setup & not a setup with errors.
An example of setup with errors means that in the live production website, a page carries a 200 status code, but that page wasn’t built in the stage now if you migrate as it is, that means a traffic-generating page from the current website goes 404 which will hurt SEO.
In this stage, you also need to check that Server Side Rendering (this is applicable for websites using JS frameworks like React, Angular, etc ) is in place. You need to check & compare the Lighthouse Lab data scores, they should either match or surpass the Production site scores.
Check device parity for a sample set of URLs to ensure that nothing is against Google’s guidelines.
A few examples are
- Meta Tags or header tags are different from the same URL for Desktop vs Mobile.
- There is a lot of content parity between the devices
- Status Code parity for the same page
- Schema only for Google Bot user agents & not for other user agents
Step 7 – Migrate the APIs & Tracking Scripts to the Stage
A huge blunder can be migrating without API Integrations and tracking scripts. When it comes to large websites, a great deal of content downloads on the webpage happen due to API integrations where the website relies on the API to add features like Cart, reviews, and some internal APIs are built to paint some and more elements on the page.
Tracking scripts are critical as they help with analytics, monitoring & paid marketing. Losing this data can disrupt the ongoing campaigns.
Step 8: Create a 1:1 Redirection Plan
This step is valid for cases where we are not retaining the URL in migration but are changing the URLs in the migration. In this case, you need to make sure that old URLs are HTTP 301 Redirecting to the new URL without chains in it. It is recommended to use HTTP redirects and not JavaScript or Meta Redirect.
This is where you need to build a 1:1 URL redirection plan & make it perfectly clear to the tech team that you need redirects without chains.
Step 9 – Redirections Testing
Imagine Migrating a large website with thousands of URLs where URL redirection also takes place, only to realize while migrating that there is a redirect bug in the redirection setup that is creating redirect chains.
Now that would be the perfect nightmare for any SEO who has conducted a website migration.
This is the reason why it’s important to test the redirections before going ahead with the migration. An additional stage instance can be created for this very purpose to test the redirection setup.
Step 10: Launch Day – Migrate the site
Now this is the day you have been waiting for. Today is the day that you migrate the website. Generally, it is recommended to carry out the migration in the nighttime when traffic is less to the website. Migrate the website. If you were treating the production website subdomain or subdfolder as a stage then don’t forget to remove the robots.txt disallow that you would have set.
Right after the migration, crawl the sample set of old URLs to ensure that they are correctly redirecting without chains and using the HTTP method.
Step 11: Using GSC Indexing API request Indexing for the top 200 SEO Value Pages
Google has created an Indexing API that can help you request indexing the for top 200 URLs at once. It’s an alternative to requesting indexing manually for one URL after another.
Right after the migration, you need to make a list of the top 200 traffic URLs, and you need to use the API for these URLs so that the crawl & indexation of these URLs is prioritized.
Altamash Mapari from Botpresso has created a Google Collab Python Script that can help you request indexing for 200 URLs at once.
Here is the link → https://colab.research.google.com/drive/1-YOmYy7CzIApHPDE_K8HGfPsPOm-85a4?usp=sharing
Step 12: Crawl the Migrated Site right away & get the errors fixed
Right after the migration, your job is to set up a crawl for the new instance in list mode.
In a secondary crawler, you can crawl the top traffic URLs to make sure that SEO elements are intact. You also need to crawl top traffic old URLs to make sure that they are correctly redirecting to the right destination URL.
Now as soon as the list mode completes crawl is finished. You need to prepare an audit of it & prioritize the fixes ASAP. You need to communicate this to the development team beforehand so that their bandwidth is expected to fix errors right after the migration.
Common Website Migration Mistakes to Avoid
1. Not blocking access to the stage instance
This is a common website migration mistake. It is critically important to disallow the stage instance & set up server-side authentication to prevent the indexation & crawling of your stage instance. The reason this is bad is that for Google it can cause duplicate content issues and your competitors can also track your development plans.
2. Not creating a backup on the current website right before the migration
There are a number of things that can go wrong in the migration process. It is important to create the latest backup of the website. So that if too many things go wrong, if the code breaks then you can at least activate the backup to control the damage.
3. Not considering consolidation
A website migration is simply creating a copy in the new instance & going ahead with it. That’s largely what’s expected in the website migration, however, there is no need to carry forward the SEO issues. Website Migration is an opportunity to consolidate a lot of no-value pages. For example, let’s say you are migrating a large e-commerce website whose faceted navigation was unconditionally exposed which created a lot of no-value pages.
The migration is an opportunity for you to consolidate those pages. Similarly, website migration is an opportunity to deal with current tech stack broken pages. In the stage instance, you can already fix the internal linking to those broken pages.
4. Not considering server-side rendering (applicable for JS sites)
A huge website migration mistake would be overlooking server-side rendering. You need to check that the stage instance is also SSR. Migrating from SSR to CSR would be a huge blunder. At the same time, website migration is an opportunity to move from CSR to SSR for the added advantages that server-side rendering offers.
5. Not verifying Page Speed Scores
Page speed is an important factor. So important that it can affect your crawl budget. If the page speed worsens from the current setup to the new one then that will have negative SEO implications. You need to make sure that it at least matches the current setup or it should surpass but it should not be worse than the existing setup.
6. You forgot to generate the XML Sitemap of new URLs
For a website migration where URLs are changing, it is critically important to create an XML sitemap. The XML sitemap allows you to submit to Google the list of new URLs that should be crawled & indexed. The XML sitemap is going to be an important part of discovery.
 What Google Says about Website Migration.